Crochet Fairy Wing Headphone Charm Pattern
Heads up: some links in this post are affiliate links. If you buy something through one of them, I may earn a small commission (at no extra cost to you). Full details in my Privacy Policy.
A simple guide to crocheting your own fairy wing headphone accessories using a 50g skein! Any spare beads or pearls you have lying around will make this project extra magical!

Materials & Tools
- Yarn: DK cotton (mercerized looks best and these colours are beautiful!) , Light (DK) · CYC 3 · 50g (1.8 oz)
- Hook: 2.5mm
- Craft beads (optional)
- Fine sewing needle (test that it passes through your beads!)
- Embroidery thread
- GaugeTension: Gauge is not critical
The pattern
- For this pattern, you are welcome to use any weight yarn! However, this will vary the final size of the project - You do not HAVE to embroider your fairy wings! Glitter or sequin yarn could easily do the job if you still want the effect without the fuss - This pattern doesn't require you to ch 1 before turning the work; simply turn the work and start the next row as normal
Abbreviations used in this pattern
| US | UK | Meaning |
|---|---|---|
| ch | ch | Yarn over, pull the yarn through the loop on the hook. |
| dc (double crochet) | tr (treble) | Yarn over, insert hook into the stitch, yarn over, pull up a loop, yarn over, pull through the first 2 loops, yarn over and pull through the final 2 loops. |
| inc | inc | 2 (or more if specified) stitches made in the same stitch. |
| sc (single crochet) | dc (double crochet) | Insert hook into the stitch, yarn over, pull up a loop, yarn over, pull through both loops. |
| sl st (slip stitch) | ss (slip stitch) | Insert hook into the stitch, yarn over, pull up a loop, pull the first loop on the hook through the second. |
| st | st | stitch |
Large wing (make 4)
- Row 1: a) Make a slipknot and chch 2
b) Make 2 scdc into the 2nd back bump from the hook (or ch if this is easier for you)
(2 sts) - Row 2: Turn work
Make 2 scdc into each stst (4 sts) - Row 3: Turn work
Make 1 scdc into each stst (4 sts) - Row 4: Turn work
Make an incinc, 2 scdc, then incinc (6 sts) - Row 5: Turn work
Make 1 scdc into each stst (6 sts) - Row 6 (extended wing): Turn work
a) In first stst: scdc, chch 1, scdc
b) In next st: sl stss, dctr, chch 2, sl stss into 2nd back bump (or ch), dctr, sl stss
c) 4 scdc until the end of row
Part a+b do not count from this point as part of the stitch count. So the end of your row should just be 4 SC. (4 sts) - Row 7: Turn work
incinc, 2 scdc, incinc (6 sts) - Row 8: Turn work
Make 1 scdc into each st across (6 sts) - Row 9: Turn work
incinc, 4 scdc, incinc (8 sts) - Rows 10–12: Turn work
Make 1 scdc into each st across (8 sts) - Row 13: Turn work
Skip next st, 5 scdc, skip next st, scdc (6 sts) - Row 14: Turn work
Make 1 scdc into each st (6 sts) - Row 15: Turn work
Skip next st, 3 scdc, skip next st, scdc (4 sts) - Rows 16–17: Turn work
Make 1 scdc into each st (4 sts) - Row 18: Turn work
a) Skip next st
b) (In next st): dctr, chch 2, sl stss into 2nd back bump (or ch), scdc
c) Skip next st
d) sl stss into last st
chch 1, fasten off, weave in the ends
Small wing (make 4)
- Row 1: a) Make a slipknot
b) chch 2, 2 scdc into the 2nd back bump (or ch) (2 sts) - Row 2: Turn work
incinc, then scdc into last st (3 sts) - Row 3: Turn work
incinc, scdc across (4 sts) - Row 4: Turn work
Make 1 scdc into each st (4 sts) - Row 5: Turn work
Skip next st, make 1 scdc into each st (3 sts) - Row 6: Turn work
Make 1 scdc into each st
(3 sts) - Row 7: Turn work
Skip next st, make 1 scdc into each st (2 sts) - Row 8: Turn work
Skip next st, 1 scdc
chch 1, fasten off, weave in any ends (1 sts)
Assembly
- Sew the wings: a) Line up 2 of the large wings so they are mirrored, sew the bottom inner corners together to connect them
b) Then line up 2 of the small wings underneath the large wings so they are mirrored. Start sewing the top corner of one small wing to the joined corners of the large wings, then repeat for the next small wing.
c) Repeat a+b for your remaining 2 large wings and 2 small wings.
You should have 2 full fairy wings at this stage! - Attach both wing sets: a) Place one wing set on top of the other
b) Make a slipknot, insert hook at any point through both panels, pull through both panels and chch 1
c) Make 1 sl stss into each space around the wings (remember to push your hook through both panels to connect them)
Note: you do not need to make a specific number of slip stitches, just continue slip stitching around until everything is connected and you have evenly spaced them out. - Curls: a) Flip the joined-together wings upside down, attach a slipknot with a chch 1 at the tip of one of the small wings
b) chch 28
c) Make 2 scdc into the 2nd ch, and into each ch across
d) sl stss into the next space on the tip of the small wing, chch 1, fasten off
Repeat these steps for the second curl
Beading (optional)
- Outline: a) With embroidery thread and your sewing needle, outline the fairy wings with beads (For longer sections of the outline I stacked 6 beads onto the thread, then sewed this down. For shorter sections/corners, I stacked approximately 3 beads onto the thread before sewing this down).
Refer to the video tutorial for visual help if needed! - The veins: To create the “cracked” dragonfly-style pattern:
a) Start by sewing a line of beads from the tip of the large wing half way down, then connect it to the outline to create an uneven “diamond” shape.
b) Repeat again, starting at the tip of the wing, beading halfway down, then connect to the side of the first diamond. Now you can make a 3rd and 4th “diamond”, where the 4th “diamond” will connect to the outline on the opposite side.
c) Flip the large wing upside down, and bead 3 vertical lines halfway down, connecting them to the 4 diamond shapes
Please refer to the photo below, and the video for extra visual help!
Note: this is a general set of instructions for the beading. Feel free to adapt and get creative with how you want the veins to look. It doesn’t matter if they are not completely identical, and uneven lines look more realistic!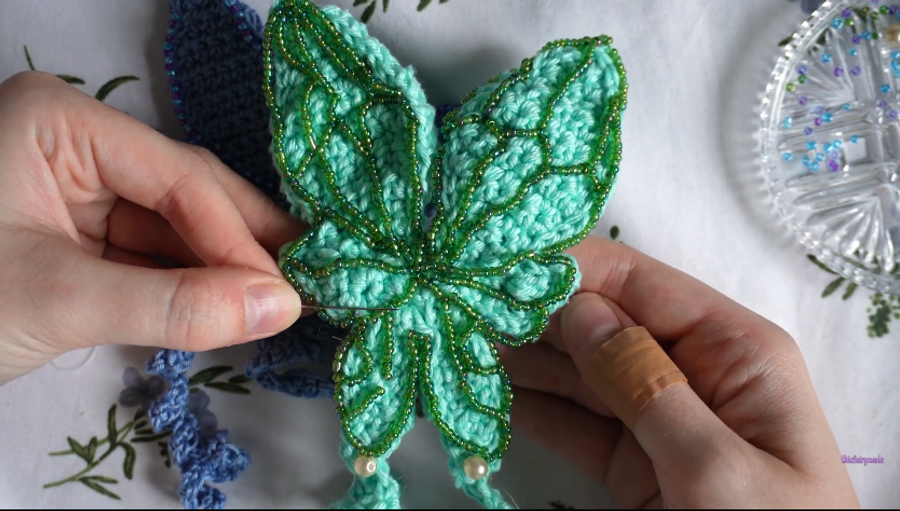
- Tie: a) Cut a short length of the main yarn used
b) With your hook, thread the string of yarn to the back of the wings in the central area
c) Tie this string to the side of the headphones to attach it, if you are making the project for a bag charm, feel free to make a set of chains and slip stitch to create a loop, or attach a metal keychain.
Video tutorial
Frequently asked questions
Why no turning chains?
Turning and working straight into the first stitch keeps the tiny edges crisp — on pieces this small a turning chain would show.
Do I have to bead it?
No — the plain wings are sweet on their own. But the beaded outline and veins are what make it read as fairy wings rather than leaves, so it’s worth the fiddle.
What do I attach it with?
A strand of yarn threaded through the back works as a tie for headphone bands; a longer crocheted chain wraps around bag handles; or hang it as-is from a hook.
Which yarn is best?
DK cotton keeps the edges defined. Anything between 2.5 and 3.5mm hooks works — size down if your tension runs loose.