Crochet Hook Storage Case Pattern
Heads up: some links in this post are affiliate links. If you buy something through one of them, I may earn a small commission (at no extra cost to you). Full details in my Privacy Policy.
Crochet the cutest fold-over case for all your crochet supplies: hooks, scissors, buttons, stitch markers (the lot!). Made by attaching 2 moss stitch panels, 4 hook pockets, 1 large scissor pocket and an envelope-style pocket. For an extra bit of detail, a picot edge stitch is used for a lacy flower effect.

Materials & Tools
- Yarn: DK yarn (Cygnet Pato Baby - Mint) , Light (DK) · CYC 3 · 100g (3.5 oz)
- Yarn: DK yarn (cream) , Light (DK) · CYC 3 · 50g (1.8 oz)
- Hook: 4mm (US G-6)
- 3mm hook (pockets and lace edge)
- Small button
- Embroidery thread
- Sewing needle
- Tapestry needle
- GaugeTension: Gauge is not critical
The pattern
- Any stitch can be used for the large flat panels, but the moss stitch gives a pretty texture! - You can customise each section to any size/length: start with more chains for a bigger width and complete more rows to build height. - Due to the moss stitch being a bulkier stitch, I used a 4mm hook, and for the smaller components (using a half double crochet) I used a 3mm hook. If you would prefer to use a single size hook for the entire pattern, you are free to do so!
Abbreviations used in this pattern
| US | UK | Meaning |
|---|---|---|
| ch | ch | Yarn over, pull the yarn through the loop on the hook. |
| hdc (half double crochet) | htr (half treble) | Yarn over, insert hook into the stitch, yarn over, pull up a loop. (3 loops on the hook) Yarn over, pull through all 3 loops. |
| sc (single crochet) | dc (double crochet) | Insert hook into the stitch, yarn over, pull up a loop, yarn over, pull through both loops. |
| sc2tog (single crochet 2 together) | dc2tog (double crochet 2 together) | Insert hook into the stitch, yarn over, pull up a loop, insert hook into the next stitch, yarn over, pull up a loop, yarn over, pull through all 3 loops on the hook. In the round: Insert hook into the front loop only of the stitch, insert hook into the front loop only of the next stitch, yarn over, pull up a loop, yarn over and pull through both loops on the hook. |
| sl st (slip stitch) | ss (slip stitch) | Insert hook into the stitch, yarn over, pull up a loop, pull the first loop on the hook through the second. |
| st | st | stitch |
Main panels (make 2)
- Row 1: Make a slipknot and chch 44 (for a 9 inch wide case)
a) scdc into the 4th chch from hook
b) * chch 1, skip a chch, scdc into next chch
c) Repeat from * until the end of the row (21 spaces and 21 SC stitches)
Note:
For other widths, chch any even number + 4, then continue part a, b and c as normal. (42 sts) - Row 2: a) chch 2, turn work
b) * scdc into the chch 1 space, chch 1, skip a stst (repeat from * until the end of the row, finishing with a SC into the chch 2 space)
c) Repeat row 2 until the work reaches 8 inches tall (or your desired height), then chch 1, fasten off
d) Make a second panel following the pattern from Row 1-2 again
From this point there will always be 21 spaces and 21 SC in the row.
Hook pockets (make 4, smaller hook)
- Row 1: With 3mm hook:
a) Make a slipknot, chch 6, then make 1 hdchtr into the 2nd chain from the hook
b) Make 1 hdchtr into each chain across (5 sts) - Rows 2–19: a) chch 1, turn work
b) Make 1 hdchtr into each stst across
c) Repeat Row 2 until you have completed 19 rows total, chch 1, fasten off with a long sewing tail.
Make two in each colour. (5 sts)
Scissor pocket
- Row 1: a) Make a slipknot, chch 14, then make 1 hdchtr into the 2nd chain from the hook
b) Make 1 hdchtr into each chain across (13 sts) - Rows 2–14: a) chch 1, turn work
b) Make 1 hdchtr into each stst.
c) Repeat row 2 until you have 14 rows in total, chch 1, fasten off with a long tail (13 sts)
Button pocket (an envelope with a flap)
- Front piece: a) Make a slipknot and chch 12
b) Make 1 hdchtr into the 2nd chain from the hook, and in each chch across
c) Row 2-5: chch 1, turn work, make 1 hdchtr into each stst across
d) chch 1, fasten off, leave a long tail for sewing (11 sts) - Back piece & flap: Repeat the steps of the front piece from rows 1-5, then:
a) Row 6-8: * chch 1, turn work, sc2togdc2tog, make 1 hdchtr into each stst across until 2 stitches are left, sc2togdc2tog (9)
b) Repeat from * until you have completed row 8
c) Row 9: chch 1, turn work, make 1 hdchtr into next 2 stst, chch 2, skip, make 1 hdchtr into the last 2 stst
d) chch 1, fasten off, leave a long tail for sewing
Fastening flap
- Rows 1–6: a) Row 1: Make a slipknot chch 5, make 1 hdchtr into the 2nd chain and each chch across
b) Row 2-6: chch 1, turn, make 1 hdchtr into each stst across (4 sts) - Border & button loop: a) Make 1 scdc into the edge spaces going down one side, across the bottom and up the other side, evenly spacing them out (16 stitches)
b) At the beginning of the top edge: scdc into the turning chain, scdc into the next stst, chch 2, skip 1, scdc into the next, scdc into the last, and sl stss back into to the first scdc of the border row
c) chch 1, fasten off with a long tail
Sewing everything on
- Position and sew: Using one of the large panels, arrange as below:
a) Four hook pockets sewn in a row at the left edge
b) The scissor pocket sewn next to this at the right edge
c) Button pocket piece (with flap) sewn above the scissor pocket (make sure to sew across where the first row of the flap starts, but not above this)
d) Button pocket smaller piece sewn on top of the flap piece with the top row left unsewn
e) Sew a small button to the top centre of the small button pocket piece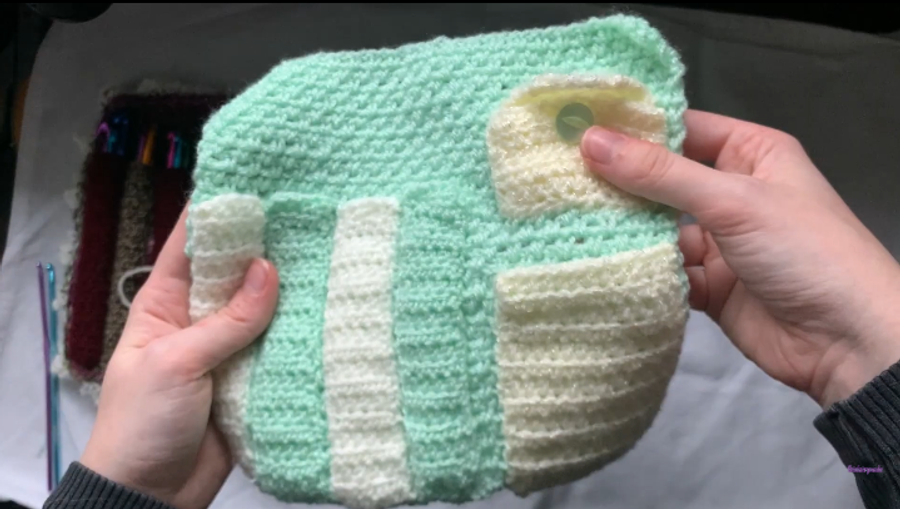
Joining and the floral edge
- Join the panels: With 4mm hook:
a) Have both panels lying on top of each other with the right sides on the outside (You will work a border row on the pocket side)
b) Make a slipknot, insert hook at one corner of the lined up panels, pull the slipknot through and chch 1
c) Make 1 scdc through both panels into each edge space around, going across all four sides. Check after every few stitches you make that the panels are still lined up neatly before continuing.
d) Make a sl stss into the first scdc, chch 1, fasten off - Floral lace edge: With 3mm hook and cream yarn:
a) Flip the work so the plain panel is facing upwards. Make a slipknot, insert at one corner and pull the slipknot through, chch 1 to attach (counts as first sl stss for the sequence below)
b) * sl stsschch 3, sl stss into same stst (petal 1)
sl stss into next stst, chch 5, sl stss into same stst (petal 2)
sl stss into next stst, chch 3, sl stss into same stst (petal 3)
sl stss into next 3 stst (repeat from * around the border) (gap spacing)
c) Once you reach towards the beginning, if you have just over 3 stst left, sl stss until you reach the first flower to roughly even out the space
d) sl stss back into the ch 1 from the beginning, chch 1, fasten off, use your hook to weave the end in
- Attach the fastening flap/button: With a tapestry needle:
a) Bring the working tail to one side of the bottom (the bottom is the side which has no button hole)
b) Sew this edge to the right side of the panel, roughly in the middle (the buttonhole should be facing the left side so when you close the case the buttonhole can easily reach over to the button on the front)
c) Mimic closing your case with the button flap to pinpoint where the buttonhole lands - and this is where the button should naturally go. sew the button to this area on the front of the case with embroidery thread and a sewing need.
Video tutorial
Frequently asked questions
Can I change the size?
Yes, you can! Refer to the bottom of 'Row 1' of the 'Main Panels' for custom sizes.
Do I need the button?
Not necessarily. You have the case as a fold-over design with no fastening, but this won't be as secure. An alternative could be to tie the edges together with ribbon, a crocheted chain, or even some scrap yarn.
Can I rearrange the pockets?
You can rearrange the placement to whatever you like! This was just a layout I liked.