Crochet Toadstool Cushion
Heads up: some links in this post are affiliate links. If you buy something through one of them, I may earn a small commission (at no extra cost to you). Full details in my Privacy Policy.
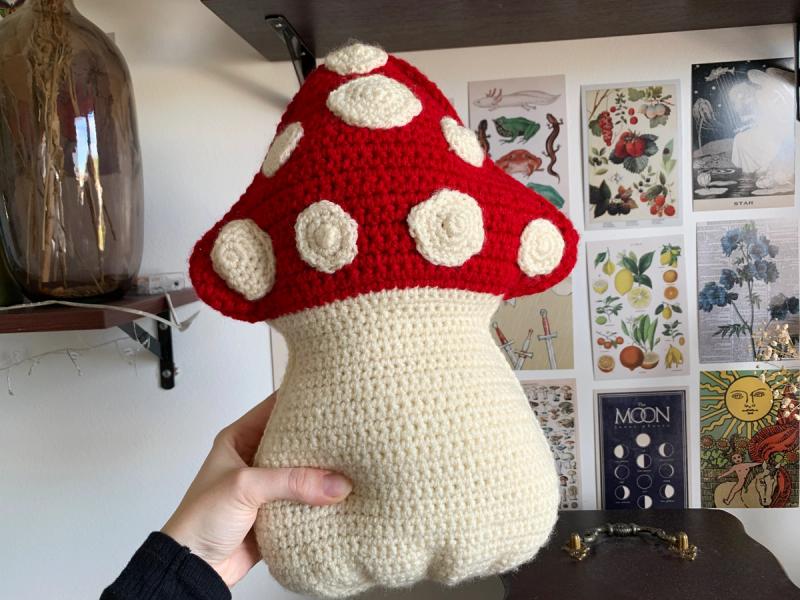
Crochet your own large mushroom toadstool cushion! This is the cottagecore decor project of your dreams, and it makes an amazing gift!

Materials & Tools
The pattern
This project is made from two identical flat panels joined and stuffed, with spot motifs sewn on top. In the video tutorial, I used chunky aran yarn, but you can easily use any other yarn weight and hook (this will affect the project size). You are also welcome to use yarn scraps instead of toy stuffing!
Abbreviations used in this pattern
| US | UK | Meaning |
|---|---|---|
| ch | ch | Yarn over, pull the yarn through the loop on the hook. |
| hdc (half double crochet) | htr (half treble) | Yarn over, insert hook into the stitch, yarn over, pull up a loop. (3 loops on the hook) Yarn over, pull through all 3 loops. |
| sc (single crochet) | dc (double crochet) | Insert hook into the stitch, yarn over, pull up a loop, yarn over, pull through both loops. |
| sl st (slip stitch) | ss (slip stitch) | Insert hook into the stitch, yarn over, pull up a loop, pull the first loop on the hook through the second. |
| st | st | stitch |
Cream base
- Row 1: a) Make a slipknot and chch 45
b) Flip the chain to the back, make 1 scdc into the 2nd back bump from the hook, then in each back bump across
(44 sts) - Row 2–6: a) Turn work
b) Make 1 scdc into each st stst across (44 sts) - Row 7 (decrease row): a) Turn work
b) Skip first stst, scdc across until you have 2 stst left
c) Skip next stst, SC into last stst (42) - Row 8 (normal row): a) Turn work
b) Make 1 scdc into each st across (42)
Repeat row 7 and 8 until you have finished row 28 (22 sts) - Row 29: a) Turn work
b) scdc into each st across (22 sts) - Row 30 (increase row): a) Turn work
b) Make 2 scdc into the first st
c) Make 1 scdc across until roughly the middle (doesn’t need to be specific)
c) Make 2 scdc into the middle st
d) Make 1 scdc across until the last st
e) Make 2 scdc into the last st (25 sts) - Row 31 (increase row): a) Turn work
b) Make 2 scdc into the first st
c) Make 1 scdc across until roughly the middle (doesn’t need to be specific)
c) Make 2 scdc into the middle st
d) Make 1 scdc across until the last st
e) Make 2 scdc into the last st (28 sts) - Round 32: a) Turn work
b) Make 1 scdc into each st across (28 sts) - Border row: Continuing from the previous row, tilt the work so you are now going into the side of the mushroom base:
a) Make 31 scdc total down the side of the base
b) Make 44 scdc across the bottom of the base
c) Make 31 scdc across the other side of the base
d) sl stss into the next st
Ch 1, fasten off (134 sts) - Rounding the bottom (decrease row 1): Flip the base upside down, Make a slipknot and attach to the corner (left side if left-handed, right side if right-handed) with a chch 1 .
a) Skip a st, scdc into the next 2 st
b) Skip a st, scdc into the next 3 st (repeat this step across until you have crocheted into that 44th st)
The work should curl slightly at this point. (33 sts) - Rounding the bottom (decrease row 2): a) Turn work
b) Skip first st, scdc across until the middle (doesn’t need to be a specific st)
c) Skip next st, scdc across until the last 2 st
d) Skip next st, scdc into the last st (30 sts) - Rounding the bottom (decrease row 3): a) Turn work
b) Skip first st, scdc into next 4 st (repeat this across) (24 sts) - Rounding the bottom (decrease row 4): a) Turn work
b) Skip first st, scdc into next 5 st (repeat this step across) (20 sts) - Rounding the bottom (decrease row 5): a) Turn work
b) Skip first st, scdc into the next 4 st (repeat this step across) (16 sts) - Rounding the bottom (decrease row 6): a) Turn work
b) Skip first st, scdc across until last 2 st
c) Skip next st, scdc into last st
Ch 1, fasten off (14 sts)
Red cap
- Row 1: With red yarn:
a) Make a slipknot and chch 6
b) Insert the hook into first st of the top of the cream base, make a scdc (this will attach the ch 6 to the base)
c) scdc across until the end of the row, then chch 7
d) Turn work
e) scdc into 2nd ch from hook, scdc into each ch
f) scdc into each st across
d) scdc into each ch to finish the row (40 sts) - Row 2–3: a) Turn work
b) scdc into each st across (40 sts) - Row 4–12 (decrease rows): a) Turn work
b) Skip first st, scdc across until last 2 st
c) Skip next st, scdc into last st (38)
Repeat row 4 until you have completed row 12 (22) - Row 13 (normal row): a) Turn work
b) scdc into each st across (22) - Row 14 (decrease row): a) Turn work
b) Skip first st, scdc into each st across until last 2 st
c) Skip next st, scdc into last st
Repeat row 13, then row 14 until you have completed row 20 (14) (20 sts) - Row 21-22 (decrease row): a) Turn work
b) Skip first st, scdc into each st across until last 2 st
c) Skip next st, scdc into last st (10 sts) - Row 23: a) Turn work
b) Skip first st, scdc into next 2 st
c) Skip next st, scdc into next 2 st
d) Skip next st, scdc into next 2 st
e) sl stss into last st
Ch 1, fasten off
Make a second mushroom panel, repeating the entire cream base steps and red cap steps. (7 sts)
Spots
- Small spot round 1 (make 5): a) Make a slipknot and chch 3, sl stss into 3rd ch to make a ring
b) Make 6 scdc into the ring (crochet over the short tail as you go to make a drawstring)
Pull on the short tail that has been crocheted into the work - this will draw the hole closed.
Place your stitch marker into the 6th SC to mark the end of the round (continue to replace the stitch marker in this spot after each round going forward) (6 sts) - Small spot round 2: a) Make 2 scdc into each st around (12 sts)
- Small spot round 3: a) Make 1 scdc into first st, then 2 scdc into the next st (repeat this sequence around)
b) Slip stitch into next st
Ch 1, fasten off, leave a long tail for sewing (18 sts) - Oval spot round 1 (make 3): a) Make a slipknot, chch 3, sl stss into 3rd ch to make a ring
b) Make 6 scdc into the ring (remember to crochet over the tail)
Pull the tail to draw the hole closed, place stitch marker in 6th st. (6 sts) - Oval spot round 2: a) Make 2 scdc into each st (12) (12 sts)
- Oval spot round 3: a) Make 1 scdc into first st, then 2 scdc into the next st (repeat this sequence around) (18 sts)
- Oval spot round 4: a) Make 8 scdc
b) In next st: scdc, hdchtr, scdc
c) Make 8 scdc
d) In last st: scdc, hdchtr, scdc
e) sl stss into next st
Ch 1, fasten off, leave a long tail for sewing (22 sts) - Sew the spots: Arrange the spots how you like, then sew each one to the red cap of one mushroom panel.
Joining and stuffing
- Join the panels: Lay the plain mushroom panel (with no spots) face down so you have the wrong side up. Lay the spotty mushroom panel directly on top, with the spots facing up.
With cream yarn:
a) Make a slipknot and attach at one of the top corners of the cream base with a chch 1 (right side if left-handed, left side if right handed)
b) Make a scdc through both stitches of the panels, all around the cream base (see video for extra guidance when you get towards the bottom of one side)
Once you have crocheted through the final st at the top corner of the other side of the cream based, ch 1, fasten off.
Stuff the cream base with toy stuffing/yarn scraps. - Join the red cap: With red yarn:
a) Make a slipknot and attach at one of the bottom corners of the red cap with a chch 1 (left side if left-handed, right-side if right handed)
b) Crochet the cream tail into the work at this step: make a scdc through both stitches of the panels, stopping to stuff the work once you reach the top section of the red cap. Continue stuffing as you connect both panels all the way around.
Once you complete your last SC of the red cap, ch 1, fasten off, tuck the red tail into the inside of the pillow using your hook.
Video tutorial
Frequently asked questions
Is it normal for the edges to curl?
Yes, this is normal, and it helps create a plump pillow when stuffing!
What if I have a different yarn weight?
It's fine to use a different yarn weight, but the outcome won't be exact to the original pattern.
How many spots should I make?
You can make as many as you like, but I felt 5 small spots and 3 oval spots were perfectly enough.